How are ceramic coatings applied?
Quick answer: Once the paint has been prepared, a ceramic coating is applied by hand in small sections with a soft applicator, worked evenly in a cross-hatch pattern, and allowed to flash. The residue is then levelled off before it hardens, a second coat may be layered where the product allows, and the car is left in stable conditions to cure. Keep it dry for 12-24 hours and avoid washing for 5-7 days.
Here is the part that surprises most people: applying the coating itself is the quickest stage of the whole job. By the time a bottle is opened, the technician has often already spent a day or more getting the paint ready. The coating goes on in small sections with a soft applicator, worked into the surface in a cross-hatch pattern so no patch is missed, left to flash, then levelled off with a clean microfibre before it hardens. The skill is not in the wiping; it is in everything that happens before and in reading the timing right.
A coating locks in whatever is underneath it
This is the single idea that explains why the whole process is built the way it is. A professional ceramic coating is closer to a thin layer of glass than to a wax. Once it cures it is bonded to the paint, and anything sitting on that paint at the moment of application is sealed in beneath it: swirl marks, water spots, bonded fallout, a smear of polish oil you missed. You cannot buff it out afterwards without removing the coating. So every preparation step is really about answering one question -- is the surface genuinely clean and genuinely correct, or are we about to make its current state permanent?
That is also why two coatings of the same brand, on two identical cars, can look and perform completely differently. The product in the bottle is the least variable part. The preparation, the environment and the installer's reading of the flash window are where the result is actually decided.
Wash and decontamination: getting to a truly clean surface
A normal wash removes loose dirt. It does not remove the things that ruin a coating bond. Over months of driving, paint picks up tiny iron particles thrown off brake discs and railway lines, splashes of tar from fresh road surfacing, and a fine layer of bonded industrial fallout that you can feel as roughness when you run a hand over a freshly washed panel. None of that comes off with shampoo.
So decontamination is done in stages. An iron-fallout remover is sprayed on and turns purple as it dissolves the embedded metal particles; tar is softened and wiped with a dedicated solvent; then a clay bar or clay mitt is dragged across lubricated paint to shear off whatever is left proud of the surface. Skip this and you are bonding the coating to a layer of contamination rather than to the paint itself, and that layer will eventually let go.
Machine polishing: the stage that decides how it looks
Once the paint is clean, it gets assessed under proper lighting for swirls, haze and finer scratches. If correction is needed, the paint is machine-polished with an abrasive compound to cut those defects out, then refined with a finer polish to bring the gloss back. This is where the depth and clarity people associate with a coated car actually comes from. The coating adds slickness and a wet look on top, but it cannot create gloss that the polishing stage did not.
It is worth being honest about scale here, because this is where a DIY kit and a professional job diverge. A proper correction on a single car can take the best part of a day with a dual-action or rotary machine, several grades of pad and polish, and constant inspection. Get the pad-and-product combination wrong and you can leave hologramming or burn through the paint on an edge. Plenty of people start a coating project full of enthusiasm and quietly conclude, somewhere around the third door, that this is more bother than it looked.
Panel wipe: the step that is easy to skip and easy to ruin
Polishing leaves behind oils and filler residues, and those oils are deliberately slick. If a coating is applied over them it bonds to the oil, not the paint, and fails early. So every polished panel is wiped down with a panel wipe solvent or IPA solution to strip those residues back to bare, clean paint. The catch is that a contaminated cloth or a cheap panel wipe can leave its own film, which is exactly the problem you were trying to solve. We work this stage methodically, fresh cloth, one direction, and check the surface under light before anything else goes near it.
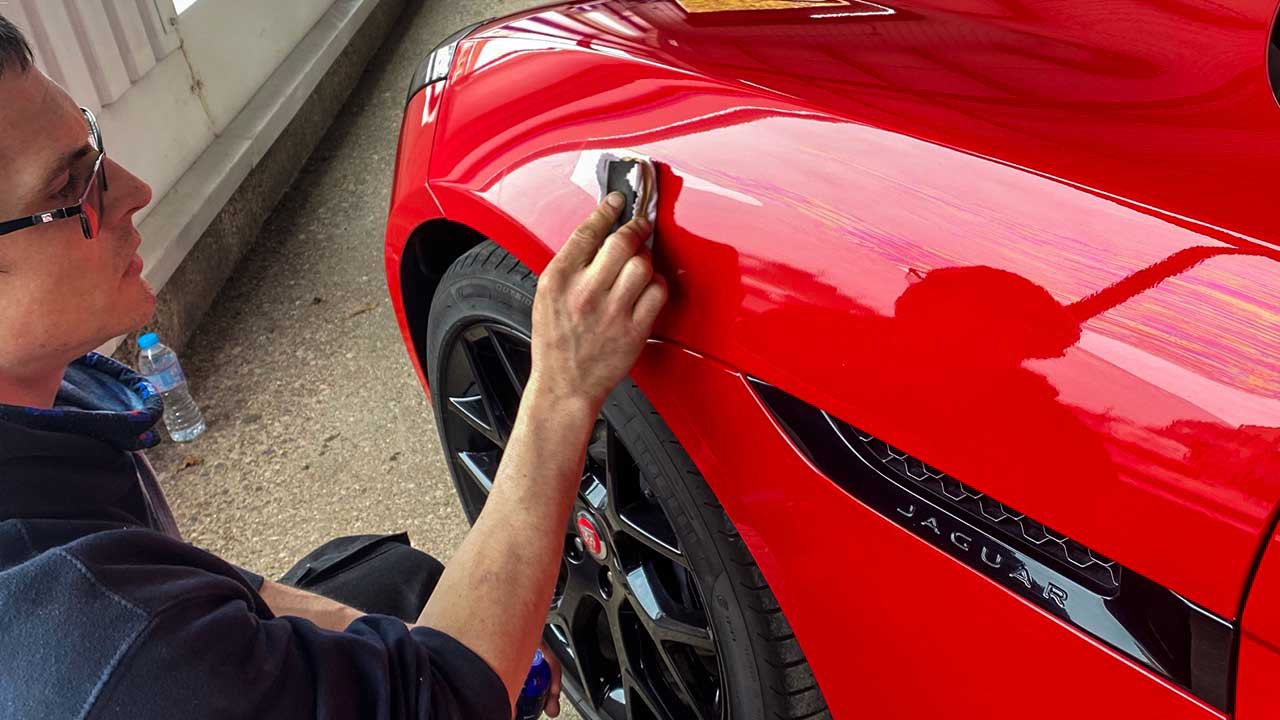
Applying the coating: small sections, even film, read the flash
Now the coating goes on, and the actual technique is unglamorous. A few drops are applied to a soft applicator faced with a suede or microfibre cloth, and laid across a small section -- typically a third of a bonnet or a single door -- in overlapping passes, first one direction then across it, so the film is even and nothing is missed. The aim is a thin, uniform layer, because thick is not better with coatings; thick just means more residue to remove and a higher chance of high spots.
Then it is left to flash. Flashing is the point where the carrier solvents start to evaporate and the coating begins to grab the surface; on most products it shows as the wet film going slightly hazy or rainbow-sheened. As soon as it has flashed, the residue is buffed off gently with a clean microfibre and the panel is checked under a light at a low angle, which is the only reliable way to catch a high spot before it sets.
Why timing is the whole game
Get the timing right and the coating levels off cleanly. Get it wrong in either direction and you have a problem. Buff too early, while the film is still wet, and you simply smear it around and pull it thin. Leave it too long and the hazy residue cures hard onto the paint, at which point it no longer wipes off and may need machine polishing to remove -- on a finish you have only just corrected.
That working window is not fixed. It is governed by temperature and humidity. A hot, dry day can shrink it to a couple of minutes per section; cold and damp can stretch it for much longer and cause uneven curing across a panel. We had a coating job during a heatwave a couple of summers ago where the flash time had collapsed so far that we dropped to working quarter-panels at a time and kept the workshop doors shut to hold the temperature steady. That is the real reason this work is done indoors, undercover, in a dust-free space you can control: it is not fussiness, it is the only way to keep the flash window predictable.
Layering and the curing period
Some products allow a second coat. Where they do, it goes on after the first has had its specified time to set, and it adds to thickness and durability rather than to correction; a second layer will not fix anything the first one sealed in. Wheels, glass and trim often get their own dedicated formulas at this stage too.
Once the coating is on, it needs to cure. The initial set happens over the first several hours, but the full chemical cure develops over days as the coating hardens to its final state. That is why the aftercare matters: keep the car dry for the first 12 to 24 hours, avoid washing it at all for 5 to 7 days while the cure completes, and then use gentle, contact-light washing afterwards. Rain or a car wash too soon can leave permanent water spotting in a coating that has not finished hardening.
What a coating does and does not do
The honest summary is that a well-applied coating gives you a slick, glossy, chemically resistant finish that sheds water and is far easier to keep clean, and it holds that good paint looking good for years rather than months. What it is not is armour. It will not stop a stone chip, it will not heal a deep scratch, and it will not rescue tired paint that was not corrected first. It protects and elevates the finish you create underneath it, which is exactly why so much of the work happens before the bottle is ever opened.