Where do I get an end of lease inspection check list?

Quick answer: Your lease company should supply a fair wear and tear guide that doubles as a checklist; if you ask, most will send the BVRLA guide or their own branded version of it. You can also use an independent end-of-lease inspection service, or a plain-English checklist built around the same BVRLA standards, to walk round the car yourself before it is collected. We publish a free one-page version you can download below.
There are really only two sources worth bothering with, and they overlap. The first is the official BVRLA Fair Wear and Tear Guide, which sets the standard nearly every UK finance and leasing company inspects against. The second is your own lease company's branded version of the same thing, which they will post or email if you ask. Both contain a checklist of sorts. The trouble is that neither is written for the person handing the car back; they are written for the inspector receiving it.
Where the official checklists actually come from
The BVRLA (British Vehicle Rental and Leasing Association) publishes the document the whole industry leans on. When your contract talks about damage "beyond fair wear and tear," this is the guide that defines the line. Most lessors either hand you the BVRLA guide directly or rebrand it with their own cover and a few house rules bolted on; the substance is the same. You can request it at any point in the contract, and it is worth doing early rather than the week before collection, because once you have read it you start noticing the kerbed alloy or the door-edge chip months before it matters.
Getting hold of it is easier than most people assume. The BVRLA publishes the current guide on its own website, and any member leasing company is obliged to make their wear-and-tear standard available to you on request; it is usually a download in your online account, an attachment to your end-of-contract letter, or a PDF the customer-service desk will email within minutes. If your finance agreement is with a smaller broker rather than a BVRLA member, ask which standard they inspect against. Almost all of them either adopt the BVRLA guide wholesale or write something so close to it that the differences are cosmetic. The one thing not to do is wait for the collection paperwork to arrive and read the standard for the first time on the doorstep.
What the guide gives you is precision: acceptable scratch lengths, dent diameters, the number of chips tolerated per panel, tyre tread limits, what counts as a missing service stamp. What it does not give you is a friendly walk round the car. It is a reference document, dense with measurements and photographs of borderline cases, and most drivers find it heavy going. That is the gap our own sheet fills.
Why we wrote a plainer version
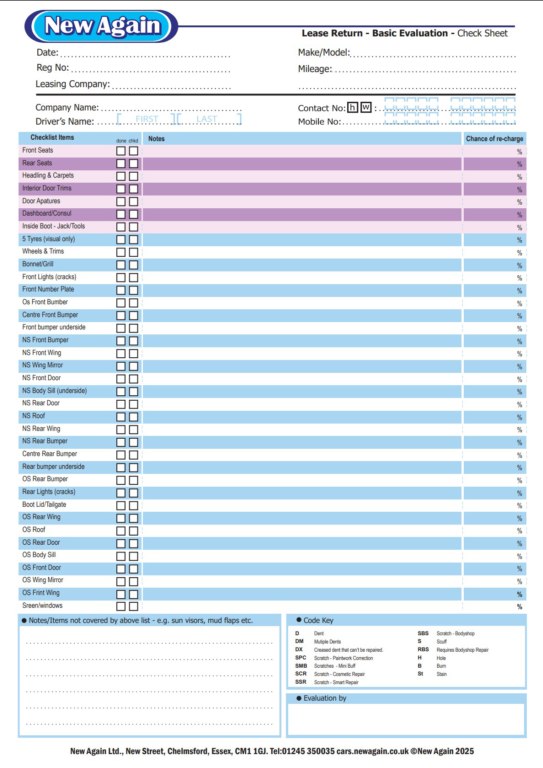
The free End-of-Lease Basic Evaluation Sheet is the same one-page sheet we clip to a board when a customer brings a car in for a pre-return check. It follows the BVRLA logic but strips it back to what a non-inspector can actually act on: walk the panels, check the wheels and tyres, test the lights, open the doors and look at the seats and carpets, write down what you find. No diameter tables, no borderline photographs; just the order to look in and space to make notes.
A proper walk round takes about twenty minutes if you are honest with yourself. Park in good daylight, ideally after a wash so marks are not hiding under road film, and go round the car the same way every time so you do not skip a panel. The sheet covers paintwork, wheels, tyres, lights, glass and the interior, in the order we work through them in the workshop.
What a good checklist should actually cover
A checklist that misses a category is worse than no checklist, because it gives you false confidence in the half of the car you remembered to look at. Whatever sheet you use, make sure it walks you through every area an inspector grades, in roughly the order they will work. These are the headings ours uses, and the ones to insist on in any version you download:
- Bodywork and paint: every panel, the bumpers, the door edges and the roof. You are looking for scratches that catch a fingernail, dents, chips and any sign of a previous repair that has not matched.
- Wheels and tyres: kerbing on each alloy rim face, tread depth across the full width (not just the centre), and whether the spare or repair kit is present and the locking-nut key is in the car.
- Glass and lights: chips or cracks in the windscreen, especially in the driver's swept area, plus every exterior lamp and indicator working, with no cracked lenses.
- Interior and paperwork: seat tears, burns and stains, carpet and boot-liner condition, smells, and the documents the inspector expects, service book stamped up to date, both keys, handbooks and any removable equipment that came with the car.
That last category is the one drivers forget, because it is not damage; it is absence. A missing second key, a lost parcel shelf, an unstamped service record or a vanished locking wheel-nut key are all chargeable, and replacing them after collection costs more than sorting them while the car is still on your drive. Run the equipment check the week before, not the morning of, so there is time to find the parcel shelf in the garage or book the missing service.
How to use the sheet before hand-back day
BVRLA's own guidance is to start appraising the car ten to twelve weeks before it goes back, which gives you time to book anything more involved than a light polish. Our sheet works to a tighter cadence within that window, and the mistake is treating the checklist as a one-off, done the night before collection when it is too late to act on anything you find. The point of having it on paper is to run it more than once. We tell customers to do a first pass three or four weeks out: wash the car, take the sheet round it in daylight, and note everything honestly. That pass is not about fixing things; it is about building a list. Then you have a few weeks to decide what is worth sorting, book any repairs, dig out the missing parcel shelf, and get the service stamped if it is due.
Do a second, shorter pass a day or two before collection, after a final wash, comparing against your first list to confirm nothing new has appeared and everything you meant to address has been. Photograph the car at that point, all round and close on any marks you have left, with a timestamp; it is your record of the condition at hand-back if a charge later turns up that you do not recognise. Keep the completed sheet and the photos together until the final invoice clears.
What a self-check tends to miss
Two things catch people out, and they are the two things we see most often when a car comes in after a self-assessment. The first is scratches you can feel but talked yourself out of: drag a fingernail across it, and if the nail catches, an inspector will mark it. The second is alloy kerbing, which drivers consistently under-rate because they have lived with it for two years and stopped seeing it. Lacquer-deep scuffing on the rim face is one of the most common recharges on the sheets we see, and one of the most avoidable.
The other blind spot is interior smell and staining, which you genuinely cannot judge in your own car; your nose has long since filtered it out. In the workshop, we made the point one afternoon that he could tell a returned lease car had been a dog car from the boot carpet alone, while the owner swore blind there was no smell at all. If you have transported pets, smoked, or carried anything that leaks, assume the inspector will notice what you no longer can.
BVRLA guide, lease-company sheet, or ours?
They are not really competing; they sit on a ladder of detail. If you want the exact tolerances an inspector will measure against, read the BVRLA guide or your lessor's branded copy and accept that it is dry. If you want something to physically carry round the car and tick off, use the plainer sheet. The honest approach is to do both: read the BVRLA standard once so you understand where the line sits, then use a simple checklist on the day so you do not miss a panel under pressure.
If you want the narrative version of this sheet, with the figures and the technique explained rather than just listed, see how to inspect your car for fair wear and tear.
Where a self-check stops being enough is the moment you find damage and cannot decide whether it is chargeable. The guide describes the line in words and pictures, but borderline cases are exactly that, borderline, and a wrong guess costs money either way: pay for a repair the inspector would have waved through, or skip one they will charge you a premium to put right. That judgement is what a pre-return inspection buys you. We walk the car the way the inspector will, tell you which marks are genuinely chargeable and which are within tolerance, and let you decide what is worth sorting. The checklist gets you most of the way; an experienced eye closes the gap on the marginal calls.